This is what I would like you to have to hand in, printed out and stapled together:
1. The main image people will see when they come to your homepage. If you don't already have an image that you know you want for your homepage, I'd like you to find an image that has the same "feel" as the image you'd like for your homepage (an "aspirational" image for your homepage).
2. The first sentence (or "headline") people will read when they visit your homepage. Try to think of this in terms of "voice" – not just a sentence that introduces people to what your site is "about," but which gives a sense of personality. It's the difference between "This is my photography website" and "As far back as I can remember, I've been in love with light." (Note: maybe, for a portfolio site, you just want to show an image with no text outside of the nabber – if so, write a sentence that will be the first sentence of your "about me").
3. A short paragraph – somewhere between two and five sentences – that people will read after that headline. Something that gives just a little more context for your site.
4. A wireframe (it can be drawn with pencil and paper) of your homepage, indicating what visitors will encounter on your homepage. This is just boxes, which could include things like – logo, main image, news feed, link to social media, etc – include what tabs your navigation bar will have.
Wednesday, February 28, 2018
Tuesday, February 27, 2018
Monday, February 26, 2018
References for Today (Monday 2/26)
We're going to look at the Dreamweaver interface today - if you'd like to install a trial version on your own laptop (the 30-day period should cover what you need to do for class), you can grab it from this page:
https://www.adobe.com/downloads.html
Today, we'll talk about the Box Model:
https://helpx.adobe.com/dreamweaver/how-to/understanding-the-box-model.html
https://www.w3schools.com/css/css_boxmodel.asp
Setting up a site in Dreamweaver:
http://www.dummies.com/software/adobe/dreamweaver/how-to-set-up-a-new-or-existing-site-in-dreamweaver/
CSS in Dreamweaver reference:
https://helpx.adobe.com/dreamweaver/using/css-designer.html
Bootstrap in Dreamweaver:
Wednesday, February 21, 2018
Assignment for Monday, 2/26
For Monday's class, I want you to do the following:
Here is a wireframe example (click to enlarge):
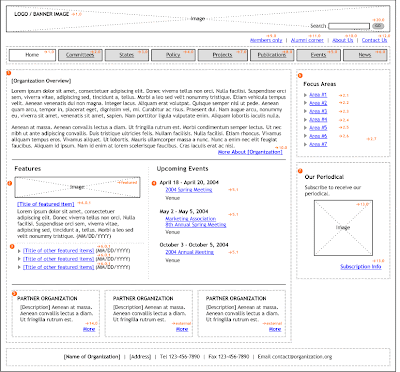
Here is a website flowchart example (you can do a google image search for "website wireframe" and "website flowchart" to see more examples). Click to enlarge:

At the end of the day, the wireframe and flowchart are just boxes – or buckets for the content to be thrown in. You'll eventually make a wireframe and flowchart for your own site, and that will give you a solid guide to know what content you need to assemble and produce to make the site feel "filled out."
Figure out what sort of website you want to make for this class. You'll still have time to adjust/change your mind, but I want to start nudging you to commit to the type of site you'll be making. Is it going to be a photography portfolio site? A site to sell apparel? A travel blog? A journalistic site? An art site?
Decide what "genre" of site you'd like to make, and find three examples of well-designed websites that already exist in that genre. So, if you're making a design portfolio site, find three portfolio sites for designers. And then:
Decide what "genre" of site you'd like to make, and find three examples of well-designed websites that already exist in that genre. So, if you're making a design portfolio site, find three portfolio sites for designers. And then:
1. Write and print out a list: what were the elements you liked about the sites you picked? What are the elements you disliked about the sites? What elements would you like to incorporate into your own site? The could be use of palette, organization, navigation, use of images, use of fonts, etc.
2. Create a wireframe for the homepage of JUST ONE of the sites you picked, as well as a wireframe for one of the "second level" pages (that is, one of the pages you get to by clicking on the nav bar), and a flowchart for the site (refer to the the images below for visual references).
2. Create a wireframe for the homepage of JUST ONE of the sites you picked, as well as a wireframe for one of the "second level" pages (that is, one of the pages you get to by clicking on the nav bar), and a flowchart for the site (refer to the the images below for visual references).
I usually use illustrator for doing up wireframes and flowcharts -- if you have any familiarity with Illustrator, it's a good tool for dealing with text, lines, and boxes.
Photoshop would be fine too -- though if you're unfamiliar with both Photoshop and Illustrator, I'd recommend just drawing these out by hand. Pencil or ballpoint pen on unlined paper would be great (and if you need to, you can steal some unlined paper from the copier on the second floor). Just make sure the names for all the navigation and content are legible.
The wireframe is to give an idea of all the pieces of content you need on a particular page. There might be some layout information in it, but it's far more about content than design. The rationale for asking for two wireframes stems from most sites having homepages that function differently than their "interior" pages, so it's necessary to have at least two wireframes (for first and second tier page functionality) to give an idea of what's going on.
A flowchart, on the other hand, doesn't give an idea of everything that's on a page, but rather gives an idea of how the site as a whole is organized -- how the menu breaks the site into various sections, that may or may not have subsections. You don't need to draw out every single page, but you do need to draw out each section or subsection of your site.
The reasoning behind this exercise is to get you to dig deeply into the site architecture of a site that is trying to solve the same sorts of problems you'll want to solve for your own website. It will hopefully give you some ideas on how to organize your own site (or how not to organize it, as the case may be).
Here is a wireframe example (click to enlarge):

Here is a website flowchart example (you can do a google image search for "website wireframe" and "website flowchart" to see more examples). Click to enlarge:

At the end of the day, the wireframe and flowchart are just boxes – or buckets for the content to be thrown in. You'll eventually make a wireframe and flowchart for your own site, and that will give you a solid guide to know what content you need to assemble and produce to make the site feel "filled out."
Wednesday, February 14, 2018
Font Usage
5. Explain how fonts can be used and styled on web pages.
-Fonts are a vital aspect to your webpage design
-Fonts can be styled as normal, italic and oblique
-Font colors, sizing and spacing may be adjusted
How can you prioritize fonts on a webpage, and how can you use a font that a user might not have installed on their own computer?
-CSS List of font families, and the browser will select the first font in the list and go down the list if the font cannot be found or downloaded
-If it's not on your computer, you may use Google Fonts for example.
Explain at least five properties of fonts that can be customized through CSS.
- font- family
- font- size
- font- style (normal, italic, oblique)
- font- weight
- font- variant
class/id
What is class and id and what´s the difference?
* Class and id is the design and is set in CSS- colours, fonts, background, placements, photos, navigation, links, etc.
*Class continues through out the page and id is one particular element
How to make class:
p {
text-align:
center;
}
p.song {
font-family: "American Typewriter";
font-size: 17px;
font-style: italic;
font-size: 17px;
font-style: italic;
}
p.alma {
font-family: "American Typewriter";
font-size: 25px;
font-size: 25px;
letter-spacing:
4px;
}
</style>
</head>
<body>
<h1>CHASING HIGHS</h1>
<p style="background-color: #EAFB00;" class="alma">ALMA</p>
<div><p
class="song"> </br>
Two a.m., I'm fading in the dark </br>
Like floating in the ocean </br>
An id tag includes one particular element (an image), while a class is used when we want to apply one style to multiple sections of text through a webpage.
Some references for Wednesday, 2/14
You'll be working in groups today to answer these questions:
REVIEW QUESTIONS
1. List out some of the basic HTML tags that usually make up a page. What are some of the most common tags, what do they control, and what are a few useful ways you can style them?
2. Explain the difference between HTML and CSS, and explain the ways they relate to each other. Compare the way you can use "inline styling" and the way you can activate an external style sheet. Give at least two examples of CSS styling.
3. What is a "class" and "id," and how to you define a class/id? How do you "activate" a class on a web page? Give at least two examples of types of styling you can execute with a class/id.
4. Explain how images can be included in web pages. Compare the use of an image that you are hosting yourself, and an image that is hosted on some other site. Give at least two examples of ways images can be styled on a web page, and show the coding behind those styles.
5. Explain how fonts can be used and styled on web pages. How can you prioritize fonts on a webpage, and how can you use a font that a user might not have installed on their own computer?Explain at least five properties of fonts that can be customized through CSS.
Monday, February 12, 2018
References for Monday(2/12)
Here's a link do a version of the template we played with last week, with a few more tweaks, and some color-coding:
https://www.dropbox.com/s/2v82ch3qr125cis/photon-template-color-coded.zip?dl=0
And here are some resources we'll talk about –
FONT RESOURCES
SPLITTING BODY AND HEADER TEXT:
https://www.dropbox.com/s/2v82ch3qr125cis/photon-template-color-coded.zip?dl=0
And here are some resources we'll talk about –
FONT RESOURCES
Embedding fonts through Google developer:
Listing of available fonts:
Where to find it in the template: main.css
@import url("https://fonts.googleapis.com/css?family=Source+Sans+Pro:300,300italic,400,400italic");
body, input, select, textarea {
color: #666;
font-family: "Source Sans Pro", Helvetica, sans-serif;
font-size: 16pt;
font-weight: 300;
line-height: 1.65em;
}SPLITTING BODY AND HEADER TEXT:
splitting h1 and body text
h1, h2, input, select, textarea {
color: #666;
font-family: "Lobster", Helvetica, sans-serif;
font-size: 16pt;
font-weight: 300;
line-height: 1.65em;
}
body, input, select, textarea {
color: #666;
font-family: Helvetica, sans-serif;
font-size: 16pt;
font-weight: 300;
line-height: 1.65em;
}
CHANGING THE COLOR OF THE FIRST HEADER TEXT:
COLOR OF HEADER TEXT
set it to blue
#header h1, #header h2, #header h3, #header h4, #header h5, #header h6, #header strong, #header b {
color: blue;
}
CHANGING THE COLOR OF THE HEADER IMAGE AS IT LOADS:
Look for "gradient"
header
#header:after {
-moz-transition: opacity 1s ease;
-webkit-transition: opacity 1s ease;
-ms-transition: opacity 1s ease;
transition: opacity 1s ease;
background-image: linear-gradient(45deg, #f20444, #4361c2);
content: '';
height: 100%;
left: 0;
opacity: 0;
position: absolute;
top: 0;
width: 100%;
}
footer
#footer {
padding: 6em 0 6em 0 ;
background-color: #d12e49;
color: rgba(255, 255, 255, 0.75);
background-attachment: fixed, fixed, fixed;
background-image: url("images/overlay2.png"), url("images/overlay4.svg"), linear-gradient(45deg, #4361c2, #4fa49a 50%, #9dc66b 95%);
background-position: top left, center center, center center;
background-size: auto, cover, cover;
text-align: center;
}
Wednesday, February 7, 2018
Parallax template
Today we'll have you start to unpack a parallax template.
Here are some sources:
Original template download page:
https://html5up.net/photon
Modified template download page:
https://www.dropbox.com/s/tymgi5yv0wb8uaf/html5up-photon-einstein.zip?dl=0
Font awesome reference:
https://www.w3schools.com/icons/fontawesome_icons_intro.asp
Complete list of font awesome icons:
http://astronautweb.co/snippet/font-awesome/
Monday, February 5, 2018
Exercise for Monday (2/5): Styling a Nav Bar
Using list elements to make a nav bar:
http://www.456bereastreet.com/archive/200501/turning_a_list_into_a_navigation_bar/
After I've gone over this page, take the source code from the finished example, then paste it into a blank text edit file, and save it as an html page to your computer. Edit the css for the page, and make the following stylistic changes:
1. change the names of all the nav buttons, and make them all external links to actual websites.
2. change the font face in the nav bar.
3. change the color of the nav bar, including in the "hover" state.
4. change the dimensions of the padding on the nav bar.
Subscribe to:
Posts (Atom)